May 29, 2026 · Matteo
How to Change Images on Shopify Website (2026 Guide)
You need to swap a hero banner, replace a blurry product photo, or fix fifty variant images after a rebrand. How to change images on a Shopify website depends on where the image lives: product media, collections, theme sections, or content pages. Each path uses a different screen in admin.
This guide walks through every common case with manual Shopify steps first, then how to change product images in bulk when your catalog outgrows one-by-one edits. For dimensions and file format rules, see our Shopify image size guidelines.
Where Shopify images live (quick map)
| Location | What it affects | Where you edit |
|---|---|---|
| Product media | Product page gallery, collection tiles, Google Image Search | Products → [product] → Media |
| Collection image | Collection page header and some collection grids | Products → Collections → [collection] |
| Theme sections | Homepage hero, banners, slideshows, featured collections | Online Store → Themes → Customize |
| Pages / blog | About page, blog posts, landing pages | Online Store → Pages or Blog posts |
Pixly scope: Pixly works on product media (upload, optimize, sync back to Shopify). It does not edit theme banners or collection hero images. This guide covers all image types so you know which tool to use.
How to change a product image in Shopify admin
This is the most common task: replace the main photo or add gallery images on a product page.
Step 1: Open the product
- In Shopify admin, go to Products.
- Click the product you want to update.
- Scroll to the Media section.
Step 2: Replace or add images
To replace an existing image:
- Click the image thumbnail.
- Choose Replace (or delete the old file and upload a new one).
- Upload your new file. Shopify accepts JPEG, PNG, GIF, WebP, and HEIC up to 20 MB per file, per Shopify's product image documentation.
To add a new gallery image:
- Click Add media or drag files into the Media area.
- Reorder thumbnails by dragging. The first image is usually the featured product image on collection pages.
Step 3: Update alt text and filename
- Click each image after upload.
- Enter alt text that describes the product (color, material, angle). This helps Google Image Search and screen readers.
- Shopify uses the uploaded filename on the CDN. Rename files on your computer before upload if you care about SEO filenames (e.g.
navy-linen-shirt-front.webpinstead ofIMG_2847.jpg).
Step 4: Save and preview
Click Save, then View the product on your storefront. Check mobile and desktop. If the crop looks wrong on collection grids, your theme may be center-cropping non-square images. See our image size guide for 1:1 square targets.
Time cost: About 3–5 minutes per product if you replace multiple images and write alt text properly.
How to change the main (featured) product image
The first image in the Media section is typically the featured image on collection pages and in some apps.
- Open Products → select the product.
- In Media, drag your preferred image to the first position.
- Save.
To change the featured image without reordering, some themes also expose a "featured image" picker in the product editor. The drag-to-first method works on all stores.
How to change collection images on Shopify
Collection images are separate from product photos. They appear on collection landing pages and sometimes in navigation menus.
- Go to Products → Collections.
- Open the collection.
- Under Image, click Add image or Change.
- Upload a wide banner-style image (theme-dependent sizing, often 1920 × 600 px or similar).
- Add alt text and save.
Collection images do not sync through Pixly. Edit these manually or in the theme editor if your theme pulls collection art from a section instead.
How to change homepage and theme images
Homepage heroes, slideshows, and image banners live in the theme editor, not in Products.
- Go to Online Store → Themes.
- Click Customize on your live theme.
- Click the section that contains the image (Hero, Slideshow, Image banner, etc.).
- Click the image block → Select image → upload or pick from Files.
- Save.
Theme images are store-design assets. Changing product photos in admin will not update your homepage banner, and vice versa.
How to change images on Shopify Pages and blog posts
For Pages and Blog posts:
- Go to Online Store → Pages or Blog posts.
- Open the entry.
- In the rich text editor, click the image → Replace or delete and insert a new image.
- Save.
These images are content assets, not product catalog media.
When manual image changes stop scaling
Manual replacement works for a handful of SKUs. It breaks down when you need to:
- Replace or optimize hundreds of product images after a rebrand or supplier swap
- Apply consistent WebP conversion, square crops, and SEO filenames across the catalog
- Add or fix alt text on every variant image
- Confirm changes actually synced to Shopify without clicking product by product
That is where a review-first bulk workflow saves weeks.
Bulk product image changes with Pixly
Pixly connects to your Shopify store and focuses on product media:
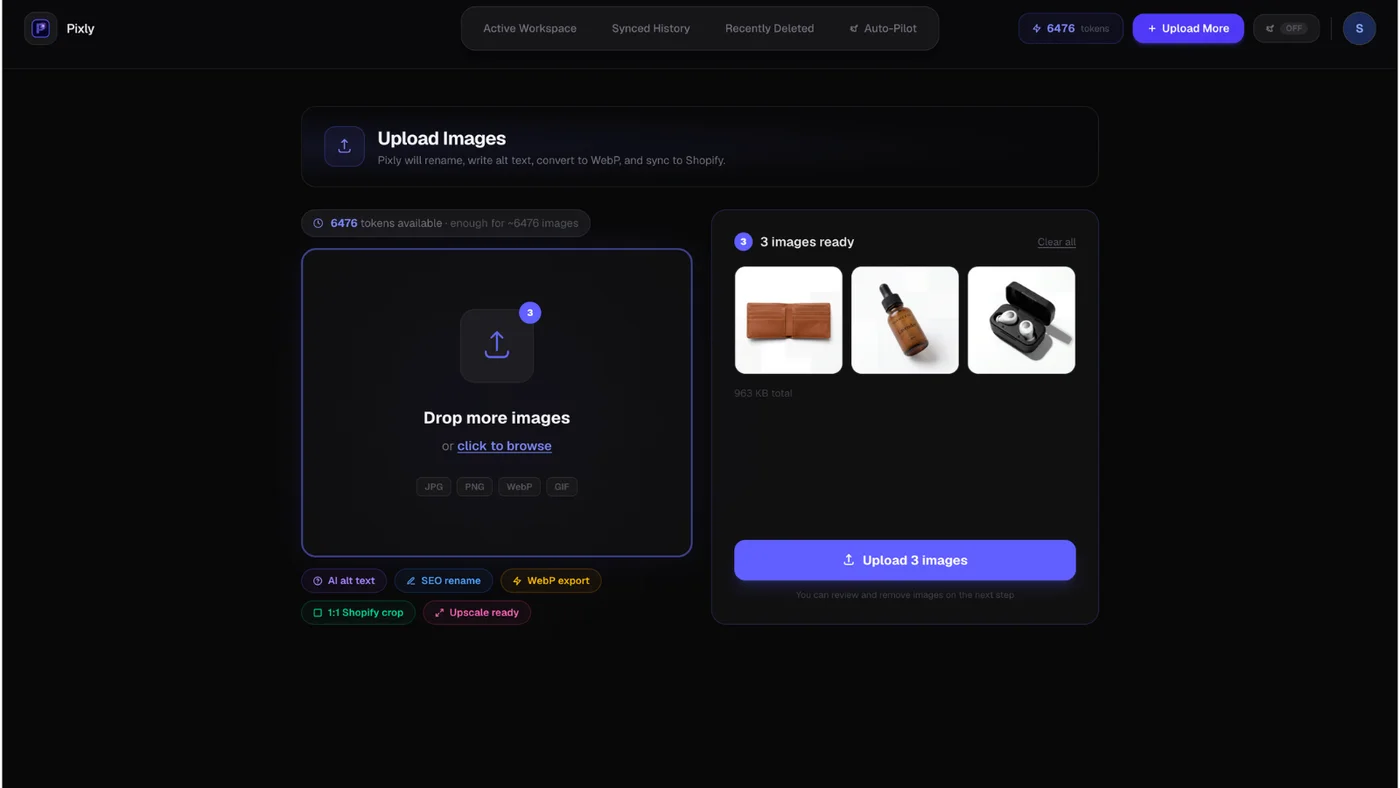
- Import or upload product images from your catalog.
The Pixly upload screen is where you drag in files or pull images from your connected Shopify store:
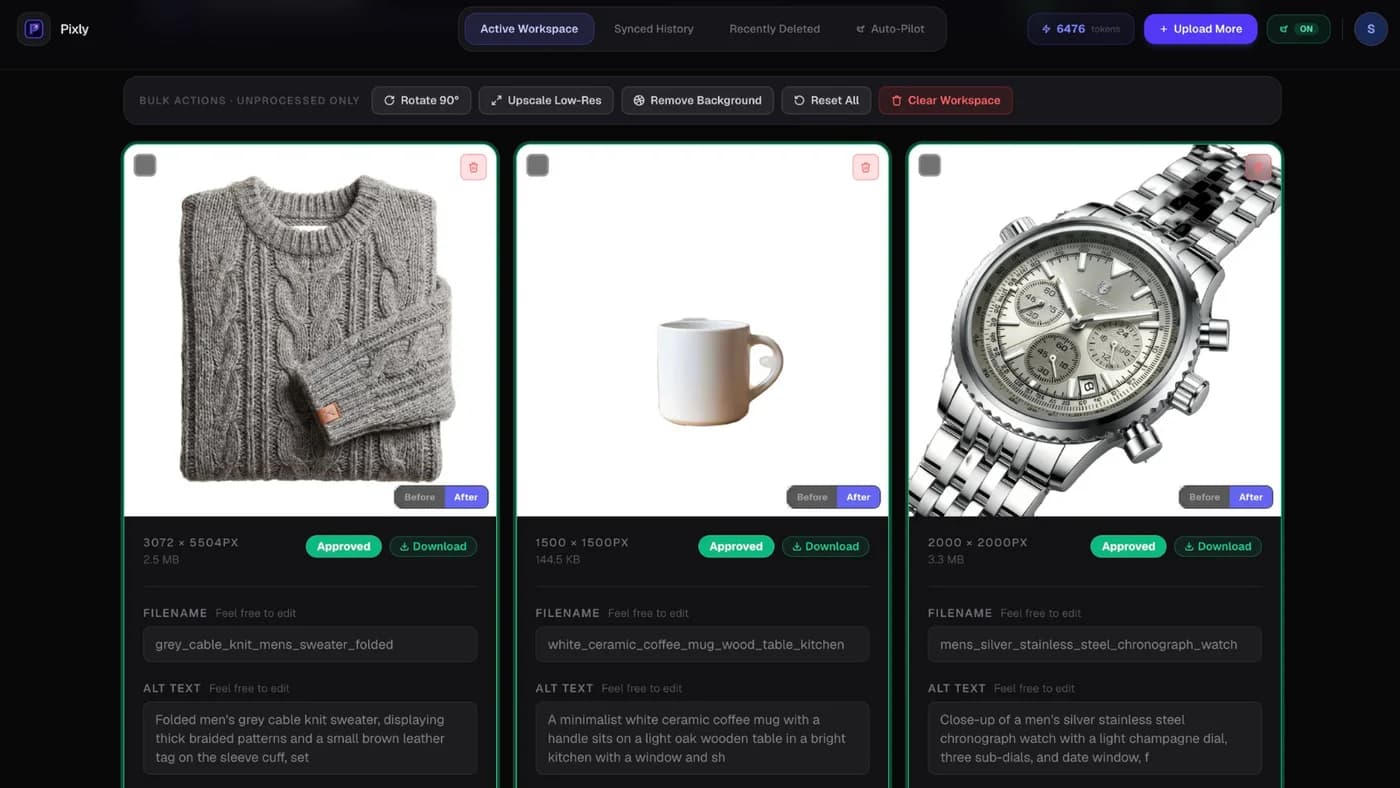
- Review AI-proposed alt text, SEO filenames, WebP conversion, and 1:1 square crop per image.
This is the Review step. You see the proposed filename, alt text, WebP setting, and square crop before anything goes live:
- Approve what you want (bulk approve supported).
- Sync back to Shopify so product pages update with optimized files and metadata.
After sync, Sync history shows every image that reached Shopify, with filename and alt text, so you can confirm bulk changes without opening each product in admin:

Try it free: Install Pixly on the Shopify App Store. The free plan includes 69 tokens per month for real products. Read how Pixly works for the full pipeline.
Common mistakes when changing Shopify images
- Uploading huge originals (4000 px+) when 2000 px square is enough. Slows pages without visible quality gain.
- Forgetting alt text on replacement images. Google and AI shopping tools read alt text, not just the visual.
- Mixing aspect ratios across products. Collection grids look uneven when some photos are portrait and others square.
- Editing theme images when the problem is product media (or the reverse). Check the map at the top of this guide first.
- Bulk replacing without a pilot batch. Test 10 products, preview the storefront, then roll out.
Checklist: change product images safely
- Confirm which image type you are editing (product, collection, theme, page)
- Export or resize to 2000 × 2000 px square for product photos when possible
- Write unique alt text per image
- Use descriptive filenames before upload
- Preview on mobile after save
- For catalog-wide changes, run a small batch first, then scale with Pixly features like Store Audit
Got questions?
Frequently asked
What to read next
- Shopify image size guidelines for dimensions, WebP, and resolution
- How to optimize Shopify store speed when heavy images slow your storefront
- Pixly FAQ for plans, tokens, and sync behavior
Bottom line
How to change images on a Shopify website is straightforward in admin for one product at a time. Product media, collection art, theme banners, and page content each have their own edit screen.
For catalog-wide product image changes, manual clicks do not scale. Use a review-first bulk tool so every image gets consistent size, format, alt text, and filenames before it syncs to Shopify.
Install Pixly on Shopify and run your first batch on the free plan.
Written by Matteo, founder of Pixly. Questions? hello@getpixly.app
Pixly for Shopify
Your product image studio for Shopify
Square WebP, alt text, and clean filenames on every product photo. Review before sync. Start free with 69 tokens every month.
More from Pixly
- How Pixly works — upload, AI analysis, review, Shopify sync
- Features — Store Audit, Auto-Pilot, WebP, alt text
- Pricing — start free with 69 tokens per month
- Shopify image size guidelines (2026 Guide)
- How to Optimize Shopify Store Speed (2026 Guide)